A Little Bit Of Column A (Before and After)

It’s like I’m having a contest with myself to see how long I can go without posting.

I win.

I’m dealing with a gross cold so this post is coming to you whilst inebriated with NyQuil.  Lots and lots of NyQuil.  I’m dead serious.  I’ve only gotten off of the couch about eight times today.  Most of which was to crawl about ten feet over to the landing in an effort to finish staining and poly-ing the stairs.

I’ll try to make up for the last few weeks with one obnoxiously long post.  You’re welcome.

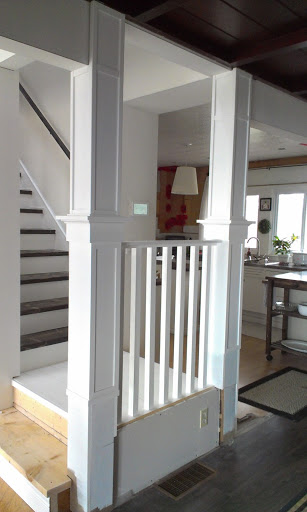
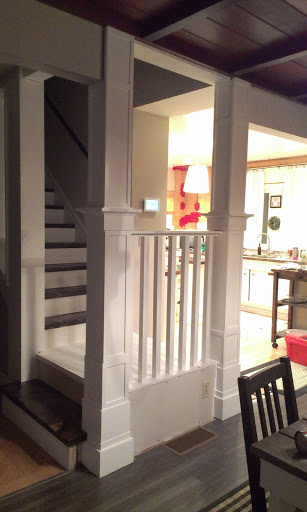
One of the biggest and ugliest challenges with this whole-house reno has been the dreaded posts at the base of the stairs.

It’s beautiful, right?  Don’t you want one, too?  The scary-ish thing about these posts is that they’re primarily responsible for keeping the second floor on the second floor.  It still boggles my mind that a handful of 2×4’s can transfer that much weight.  Sure, there are other points within the house that help to transfer weight from the giant yellow LVL beams, but they’re hidden and I don’t see them every single day.

I knew I wanted to create stately, dramatic columns, but frankly, I’ve never really done it before.  I’ve played with moldings and trim to come up with some pretty profiles before, but this was new territory for me.  I pinned my heart out with images of columns and bases to get my brainz wrapped around how I was going to tackle them, but I was considerably freaked-out at this project and I let it sit.  Until just a couple weeks ago. That’s almost five months.  Five months of yelling “Don’t touch the posts!!! You’ll get a splinter!!!” every time the boys hung onto them like a firepole.

Enough was enough and it was time to just dive the heck in.  But there was one step that needed to be completed before I could start:  I needed to address the landing issue and the lack of flooring on said landing.

We were originally planning on carpeting the stairs and landing but I nixed that idea mid-stream, leaving me with a REALLY rough starting point.  I didn’t want to lay the floating flooring down that I was doing on the rest of the house because I thought it would clash with the steps going up and look ridiculous.  I thought about just painting the plywood and calling it a day (“You’re a DAY!”) but I knew that would look cheapo.  So, I came up with a plan to lay some faux painted plank flooring.  Although, I don’t know if it’s really faux.  It’s wood.  It’s cut in planks.  It’s painted.  It’s faux sho’ on the floor.  So, technically, it’s the real deal.  Right?

John ripped a sheet of 1/8th-inch plywood down to four-inch strips and I got to work gluing and nailing them down on the landing.

I used two dimes at either end for spacing because I wanted to keep a visible seam after I painted.  I also added a piece of 1×2 mdf on either side of the landing as a sort of bullnose to mimic the profile of the steps.

And then I got to painting.

I like the idea of possibly doing a decorative paint treatment on the landing, but the rustic charm of the plank floor looks pretty sweet as-is.

Back to the columns.  Did you forget about them?  Are you still with me?  …tap, tap, tap….  Is this thing on?

Now that the landing had flooring, I could get started on those damn posts.  I started by sitting down and staring at them.  For a long, long time.  Then I dug through my mdf scraps and got to work putting together my column puzzle.

Creepy, blue tint courtesy of my awesome camera skillz

And in the almost-end, I have this:

I added a funky ‘X’ detail to the outsides of each column.
They’ll tie in with another project I have in mind for the kitchen.

I still have a few bits of finish work to do before I call the landing complete:

  • Caulk, caulk, caulk and add a final coat of paint
  • Finish the risers for the bottom stairs
  • Add a coat of poly to the landing
  • Finish the trim for the outside of the landing
  • Change out the almond-colored receptacle for a white one
I’ll do a ‘final reveal’ post soon with all of the finishing touches once I get over this stinkin’ cold and muster the strength to get off of the couch and actually do the items on the above list.  For now, I’ll just stare at all of the hard work that’s finally behind me.

(Linking up to YHL’s fantastically awesome ‘Pinterest Challenge’!)

I Can See Clearly Now, The Wall Is Gone. (Before & After)

Let’s get to some fun stuff, shall we?  Renovating the first floor involved ripping off our living room ceiling and installing a bajillion (okay, eight) recessed lights.

Having never lived anywhere that had recessed lighting, I LOVED the upgrade.  I couldn’t wait to get the ceiling drywalled and painted and install the trim kits for the lighting and and and….  But then our drywaller (is that a word?  Drywall technician?) said, “Yo, I ain’t drywallin’ this joint unless you tear down the walls and I get to drywall them, too.”  Okay, he didn’t say it exactly like that, but it was close.  And when he said that, I looked at him like this:

(via)

 Here’s the deal, when we rebuilt the ceiling/added the second floor joists, an almost two inch gap was left along the top edge of the wall.

This would mean that when we put the drywall up on the ceiling, we’d have no other choice than to add crown molding to the room to cover up the space where the wall and ceiling wouldn’t meet.  I wouldn’t say that I was opposed to it.  I love crown molding.  I hate installing the stuff, but I love it nonetheless.  In the end, we decided to just rip the damn drywall off the walls and get the entire room re-drywalled along with the ceiling.  It ended up being cheaper this way if you factor in the cost of a nice, chunky crown trim, the time it would take me to install the molding, as well as the added expense of placing me into a mental institution because oh my God why can’t I ever get those stupid angles right with crown molding???!!!!

Ahem.  Excuse me.

So, down with oppression!  Down with the existing drywall!

A strange thing happened when we tore the drywall down.  I could see the new staircase!  And I didn’t want to cover it back up!  You can’t make me!  This my house!

We I opted to leave that wall open because I had visions of little feet padding down the stairs on Christmas morning, getting a glimpse of their gifts under the tree.  I was gonna yank out those 2x4s by the stairs and I thought a pretty railing would be the cat’s meow and that it would bring a little more interest to that side of the room.

Then the inspector shot my ideas down like Paula Abdul’s cold-hearted snake.  Apparently he was all concerned with the “structural integrity” of my house.  He told me I couldn’t cut out the studs.  And I looked at him like this:

Psht.  What does he know?

Turns out, a lot.

The second floor’s support beam rests on those very 2x4s.  So, taking them out means I could be seriously compromising our casa.  I was torn.  I knew I wanted to keep it open and fresh and bright, but I had those stupid studs to contend with.  The inspector suggested that I install another, stronger support beam to run across the top of the ceiling in place of the studs.  But by that time, we had already started installing the drywall on the ceiling.  And that would mean ripping down the ceiling, drawing up an addendum to submit to the town for structural approval, paying more $$$ to get a support beam, scheduling the change with the builder……

I said fo-get it.

I told the drywall guy to drywall around the studs.

Oh, yes.  I did.  And he looked at me like this:

And then he hooked a sister up.

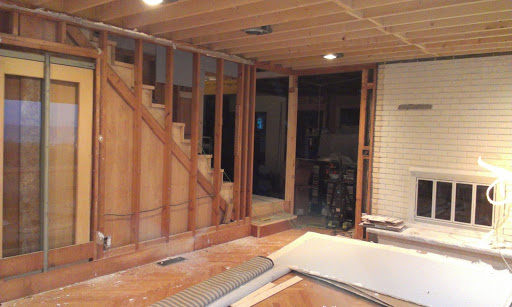
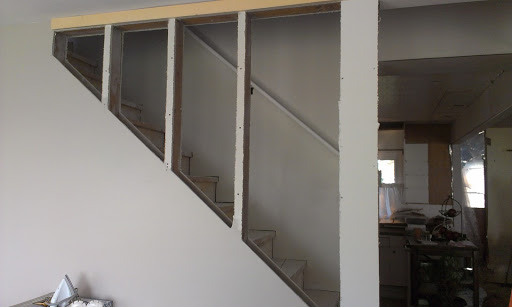
And then it sat like this.  F O R E V E R.  I didn’t know what I was going to do or how I was going to figure this hot mess out.

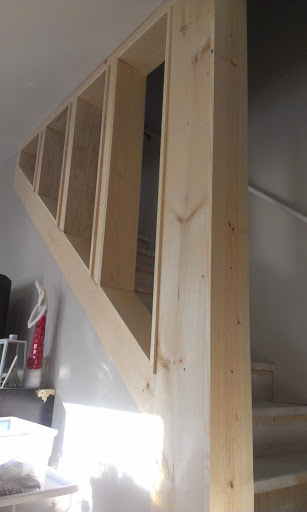
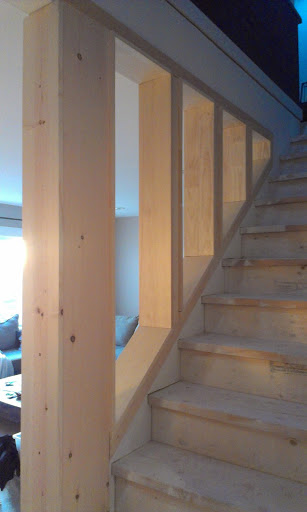
And then I started playing around with some boards and came up with this:

Figuring out those 40-degree angles just about killed me, man.

Living Room Staircase

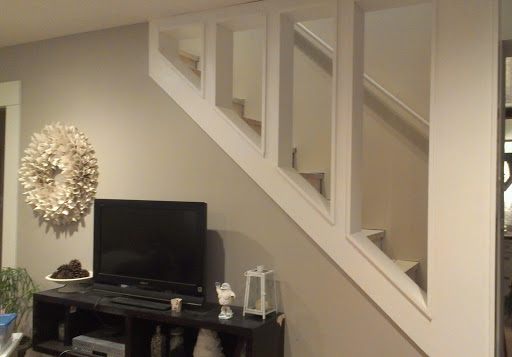
And this is how it looks today.  I still have to figure out how to get it to pass code.  Town building code requires that the spacings be no more than four inches in width.  It’s that whole baby-head rule.  If you follow me on Pinterest, you’ll notice that I’ve been pinning a bunch of staircases to glean some ideas.  I think I have it figured out, so you’ll just have to stay tuned to see what I do.

So, just to recap, this is what I started with:

And this is where I ended up:
Living Room Staircase

Pretty big difference, huh?

TDC Before and After